Configuring S3
Save your screenshots, PDFs and other renders to an S3 bucket from Urlbox
This guide will walkthough the process of configuring a public S3 bucket which means Urlbox can store your renders and also serve them when using render links.
If you prefer to keep your S3 bucket private, and only use Urlbox to store renders, but not serve them, please follow our guide on configuring a private S3 bucket with Urlbox.
The process of configuring an S3 bucket with the correct settings for Urlbox can be quite complicated, so we've put together this guide to help you through the process.
It consists of the following steps:
- Creating a new S3 bucket with the correct ACL and public access settings
- Creating a new IAM user
- Create a new IAM user group
- Adding the IAM user to the group
- Setting a policy on the group to allow access to the bucket
- Generating an access key and secret key for the IAM user
- Adding the credentials to your project in Urlbox
Configuring S3
Over in your AWS account, you should create an S3 bucket and an IAM user that has the minimal settings allowed for Urlbox to save to your bucket, as well as being able to serve the renders from it.
Creating an S3 Bucket
From the AWS console, navigate to the S3 service and click the Create Bucket button.
Fill in the required fields, such as the bucket name, and desired region where you want the bucket to be located.
For this example, we'll use the bucket name screenshots-demo and the region us-east-1.
Object Ownership
Ensure that ACLs are enabled for the bucket, and object ownership can be set to the bucket owner.
Block Public Access settings for this bucket
You'll want to untick the Block all public access checkbox, and then tick the bottom two checkboxes labelled:
-
Block public access to buckets and objects granted through new public bucket or access point policies
-
Block public and cross-account access to buckets and objects through any public bucket or access point policies
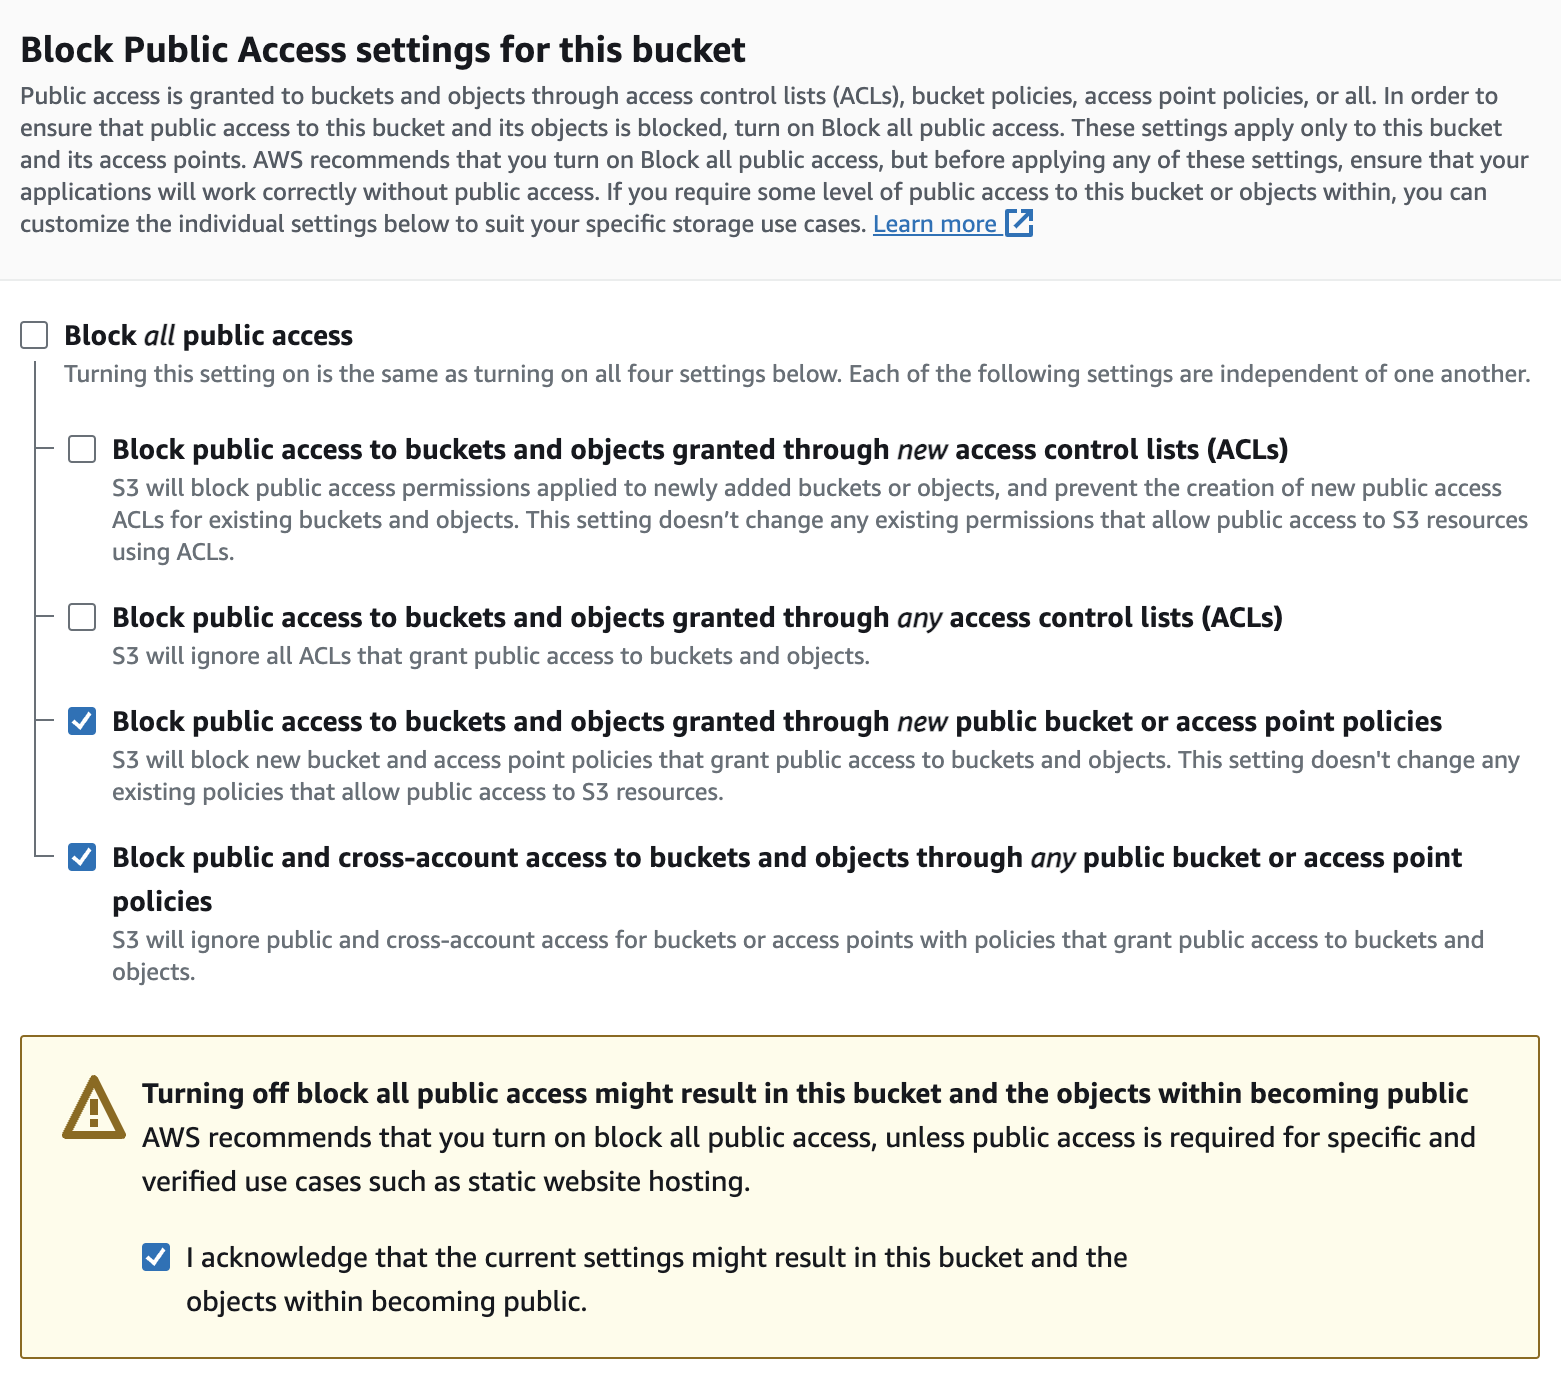
The reason we want to allow public access, is so that when Urlbox saves a render to your bucket, it can be served by Urlbox aswell.
Once the ACL and access settings are configured, click the Create bucket button to create your S3 bucket.
Creating an IAM User with access to the bucket
From the AWS console, navigate to the IAM service and click the Users link in the left hand menu. Then click the Create User button.
Name the user something like urlbox-s3 and click next.

On the next screen, select the Add User to Group option, and then click the Create Group button.
Enter a name for the group you want to add the user to, something like urlbox should make sense and then create the user group.
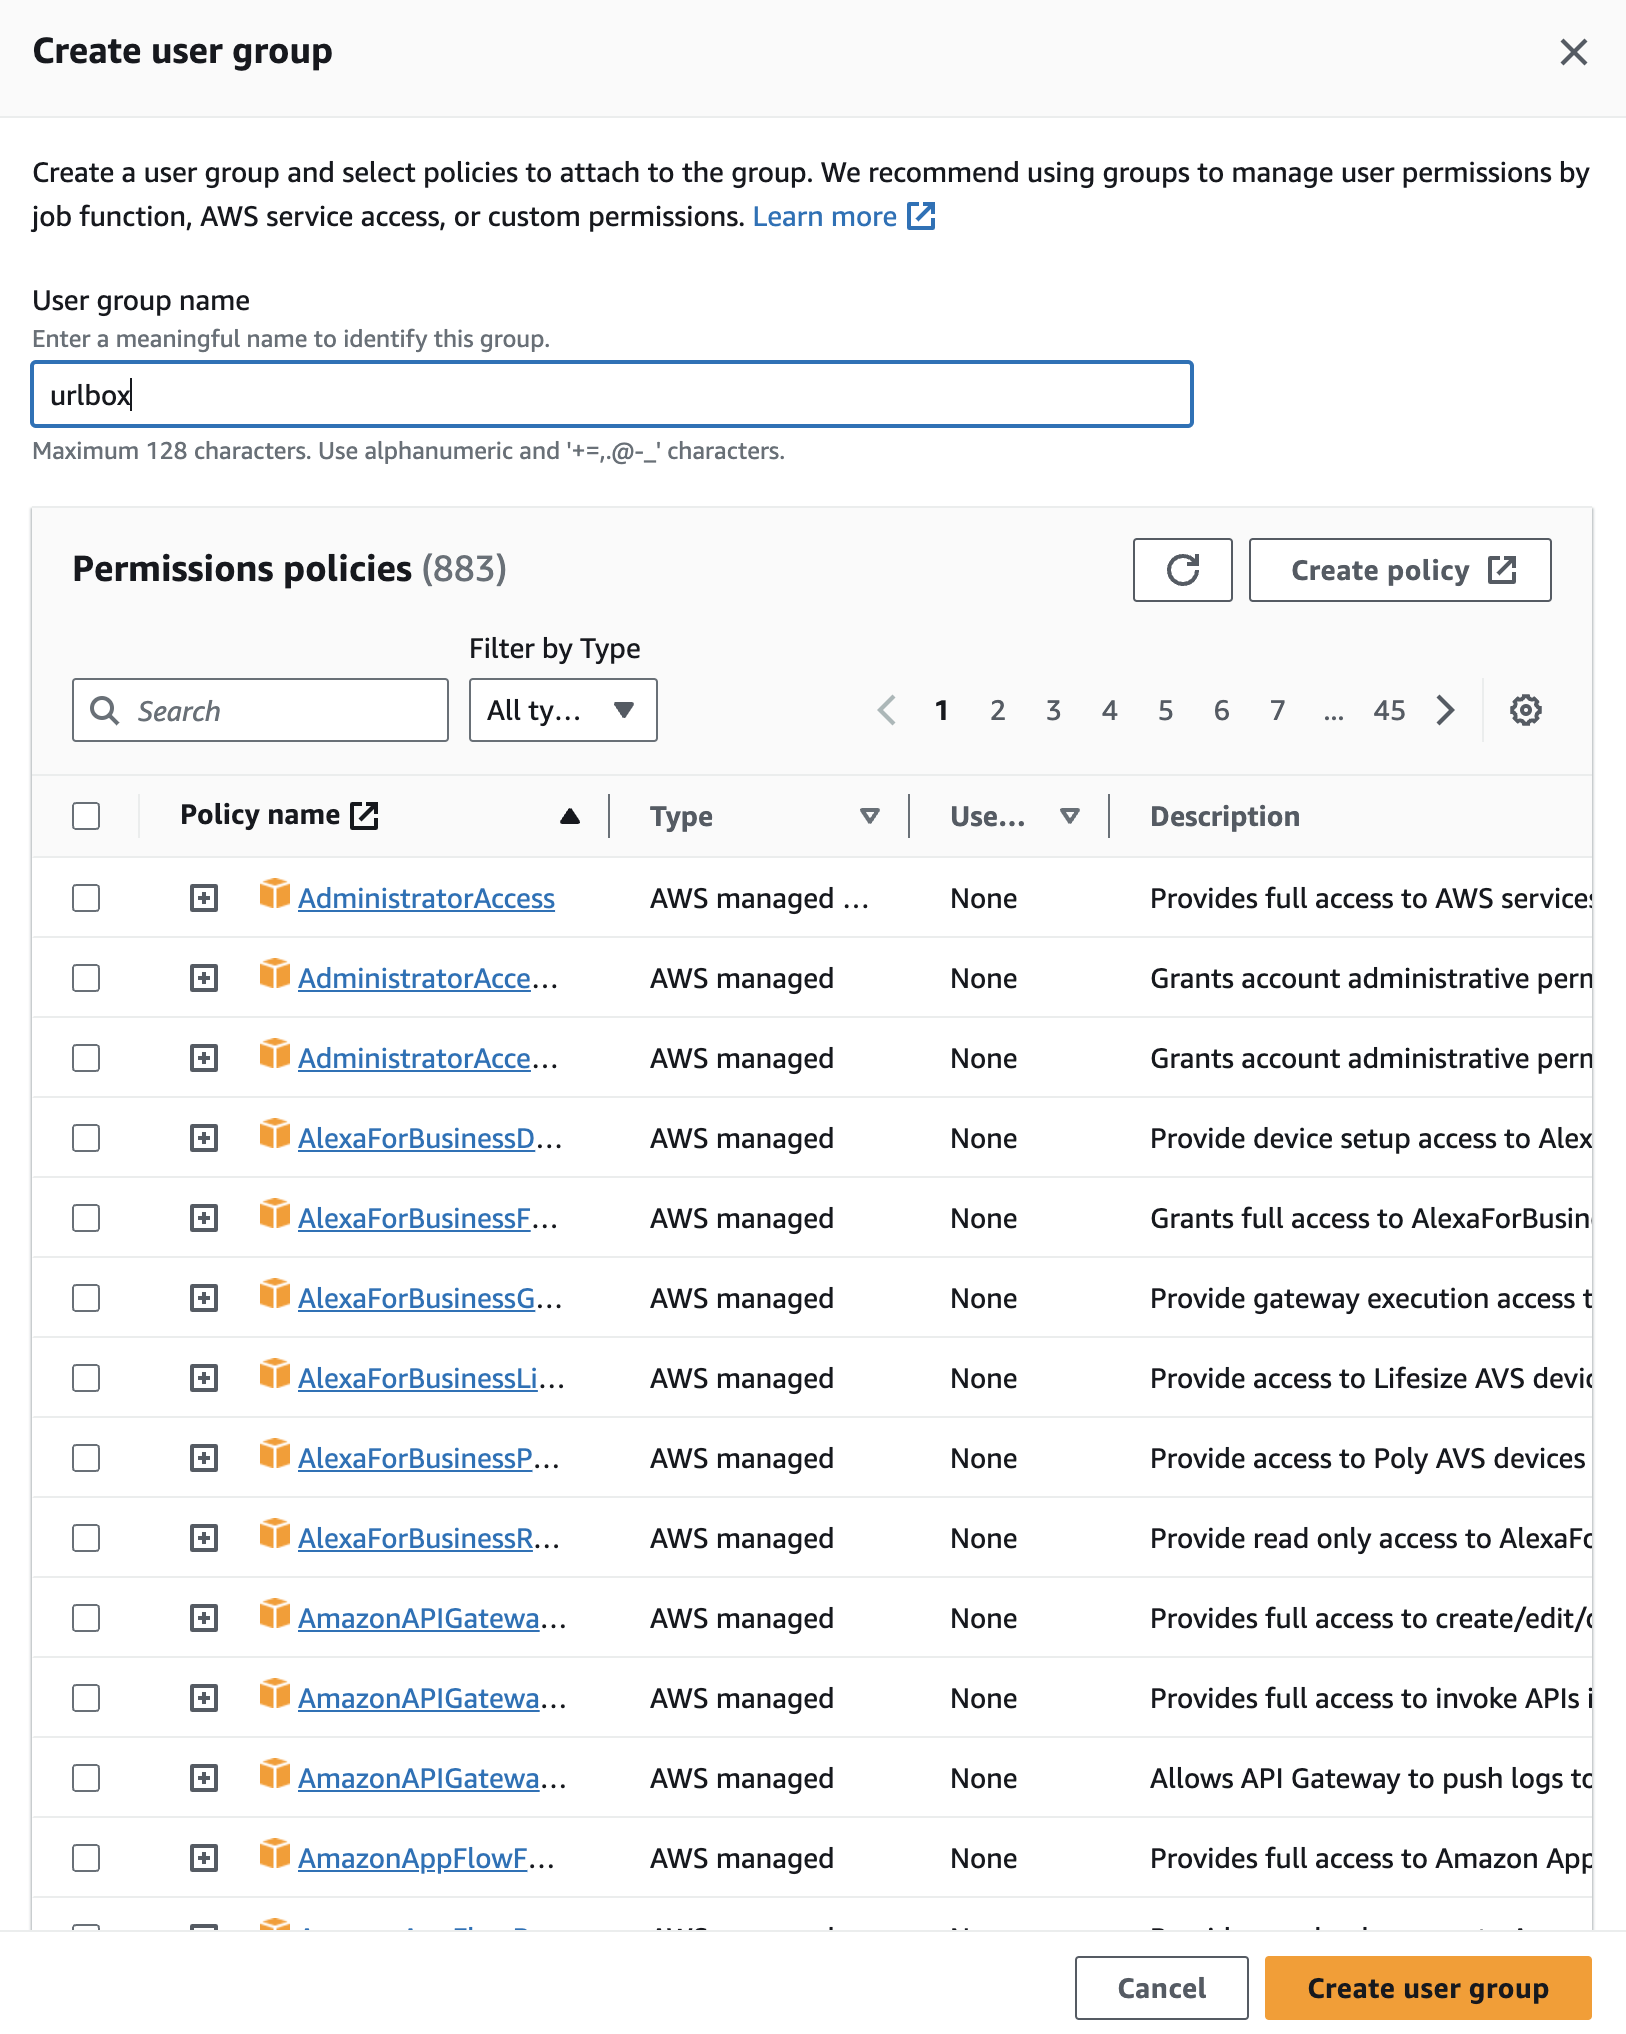
Back on the create user wizard, click next and then create user.
Adding a bucket policy to the user group
The permissions that Urlbox needs in order to save renders to your bucket, and serve them from it, are:
PutObject- to upload the render to your bucketPutObjectAcl- to add the ACLpublic-readto the uploaded object, so that anyone can view it.GetObject- to allow Urlbox to get metadata about the object, such as the size, and also to serve the object when using render links.
Now go back to the user group you created, and ensure that the IAM user you created is a part of the group.
Next it's time to add a policy to the group, so that the user can access the bucket you created.
Click the Permissions tab, and then click the Add permissions dropdown and then Create inline policy.
In the policy editor that pops up, switch to JSON view and paste the following JSON policy in:
{
  "Version": "2012-10-17",
  "Statement": [
    {
      "Sid": "Stmt1505247412000",
      "Effect": "Allow",
      "Action": ["s3:GetObject", "s3:PutObject", "s3:PutObjectAcl"],
      "Resource": ["arn:aws:s3:::screenshots-demo/*"]
    }
  ]
}
You'll need to replace the screenshots-demo part of the Resource key with the name of your bucket.
These are the minimum permissions required for Urlbox to save renders to your bucket, and to serve them from it.
Once you've pasted in the policy, click the Review Policy button, and then give the policy a name, something like urlbox-s3-policy should make sense.
Generating an access key and secret key for the IAM user
Now that the user has been created, and has the correct permissions, we need to generate an access key and secret key for the user.
Open the user again in the IAM console, and click the Security credentials tab. Scroll down to the Access keys section.
Then click the Create access key button. You will want to tell AWS that the purpose of this access key is for a third party service.
It will recommend that you use IAM roles in order to provide short term credentials to a third party, however because we have locked down the access that this user has to the least privileges required by urlbox, it is safe to use the access key and secret key directly.
If you do want to use IAM roles with Urlbox, you will need to figure out a way to refresh them each time they expire, and update the project settings with the fresh credentials.
Now you have created the access keys, it's time to copy them to your clipboard and make sure you don't lose them, as you won't be able to see them again.

Adding the S3 config to your project
Now we can go back to the Urlbox dashboard.
From within the project settings page, scroll down to the S3 Configuration section and click the Add S3 Config button.
We can copy the access key and secret key from our IAM users credentials into the S3 config form.
We should also add the region as us-east-1 and the bucket name as screenshots-demo (or whatever you named your bucket).
Make sure not to select the private bucket option, as we are configuring a public bucket.
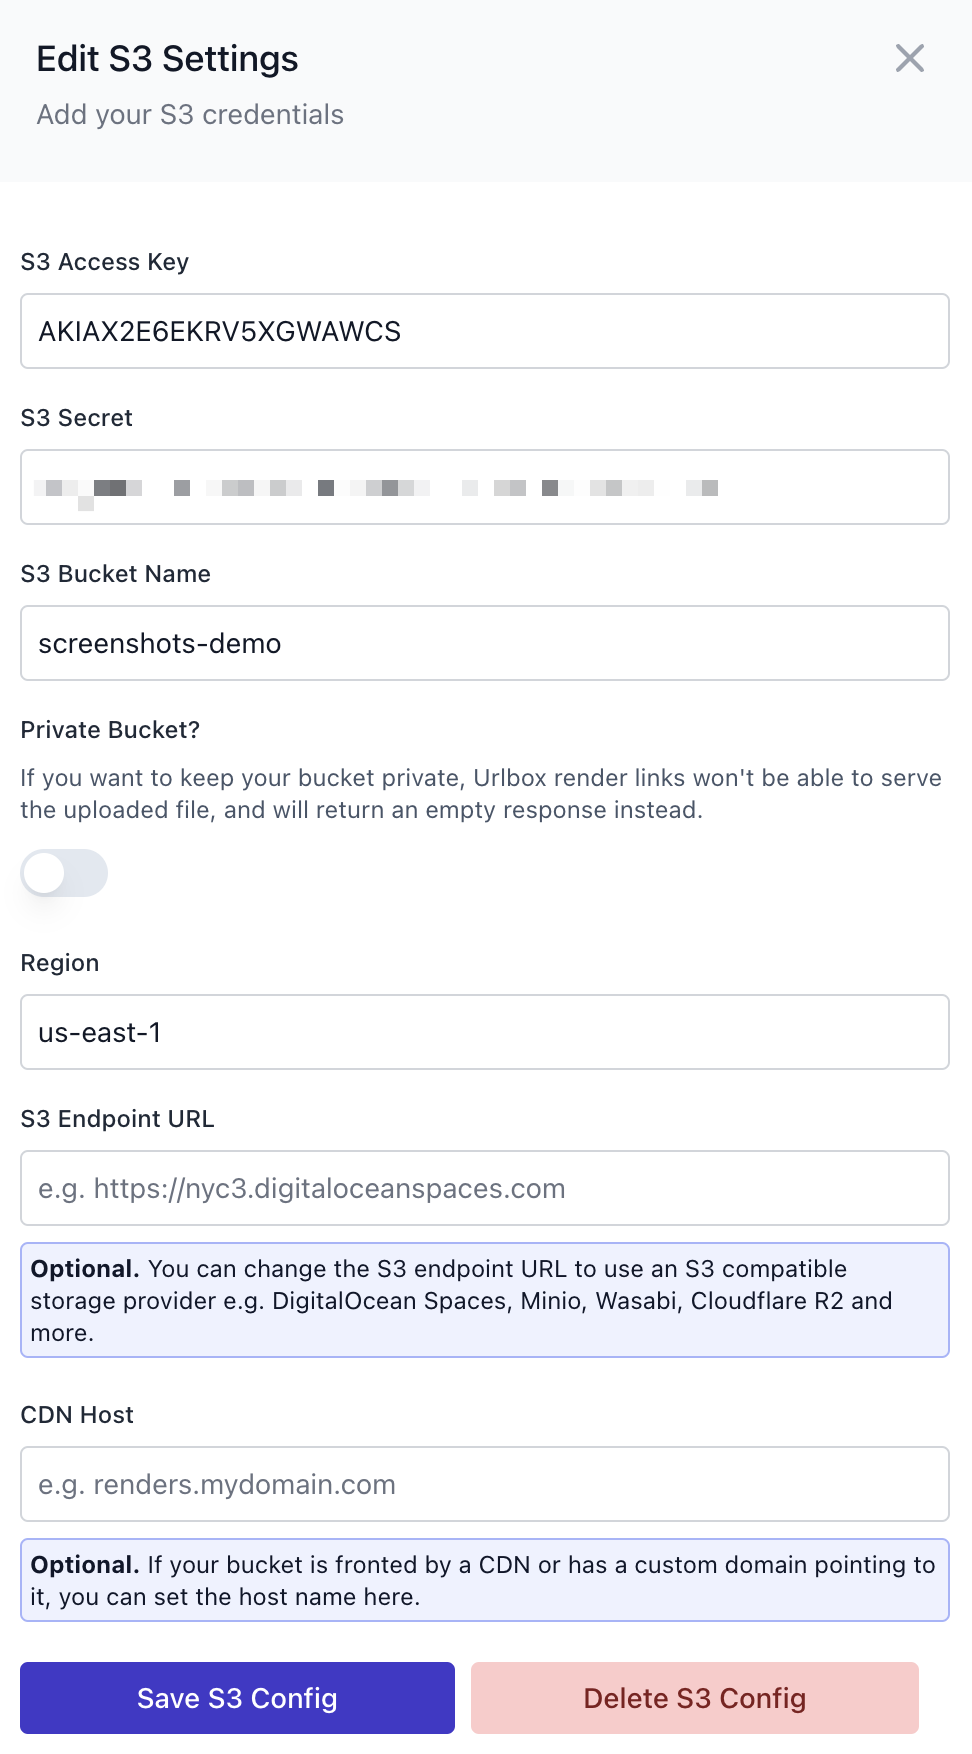
Then click Save S3 Config, and if everything is configured correctly, the form should disappear and you should see a success message.
When you click Save S3 Config on the form, Urlbox will attempt to upload a file to your bucket at urlbox_test/deleteme.txt to ensure that the credentials are correct.
Because Urlbox does not have delete credentials on your bucket, this file will remain in your bucket and you can delete it once the bucket is configured correctly.
Debugging Errors
If you see an error message when you click Save S3 Config, it means that Urlbox was unable to upload the test file to your bucket. This could be for a number of reasons:
- The bucket name is incorrect
- The bucket does not exist
- Bucket does not have the correct public settings
- Bucket does not have the correct ACL settings
- The IAM user does not have the correct permissions
Please check all of the above and follow the steps in this guide to ensure that the S3 bucket is configured correctly. Please reach out to support if you are still having issues.
Start saving screenshots to your S3 bucket
Now that your S3 bucket is configured correctly, you can start saving screenshots to it.
You can do this by setting the use_s3 option to true in your API request.
For more options on how to configure how renders are saved to your S3 bucket, please see the saving to s3 guide.
