Quick Start
Quickly learn how to use Urlbox's rendering API
Thank you for checking out Urlbox. This guide will cover the basics to start rendering quickly.
Prerequisites
- Get your API key and secret key from the dashboard.
- If you don't have an account, sign up for a 7-day free trial.
Making your first request
- Create a basic render link using your api key and desired output format:
https://api.urlbox.io/v1//?- Modify the options query string to fit your rendering preferences. All rendering options are decribed in detail in the render options reference page.
Example
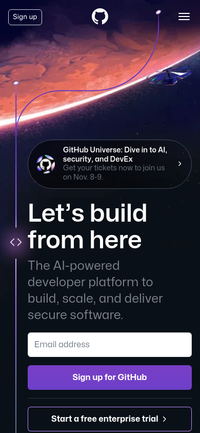
Render a thumbnail screenshot of github.com, taken from a mobile viewport.
Set the format to png and the url to github.com, with a viewport width of 390px and height of 844px to mimic a mobile device. Additionally, set thumb_width to 200 to resize the image to 200 pixels wide.
The render link will look like this:
https://api.urlbox.io/v1//?Now open that up in a new tab, and you should see something like this:
Secure your links
For production use, you'll want to use secure render links to ensure only authorized users can render screenshots on your account:
https://api.urlbox.io/v1///?The token is a HMAC-SHA256 token of the query string options signed by your secret key
Example with Authentication
Let's take the previous example, and add authentication to it.
Create the token from the query string in javascript (we have example code to do this for other languages too):
import hmacSha256 from "crypto-js/hmac-sha256";
const secretKey = "";
const options = "url=github.com&width=390&height=844&thumb_width=200";
const token = hmacSha256(options, secretKey).toString();Insert the token into the render link:
https://api.urlbox.io/v1///?This is now a secure render link. If somebody was to come along and try to change any of the options, to create a different render, the token would no longer be valid, and the request would be rejected. The only way for someone to generate a valid token is to know your secret key, which is why you should try to keep it secret.
Using the JSON API
Urlbox also offers a JSON-based REST API for synchronous and asynchronous rendering.
The API uses Bearer token authentication, with your secret key as the token. Insert it in the Authorization request header: Authorization: Bearer .
Example using JSON API
To use the same example with the JSON API, POST the options as JSON to the /v1/render/sync endpoint.
Request
and we'll get back a response like this:
Response
-
The
renderUrlis temporary and will expire after 30 days. To keep the image, you'll need to download it, or tell Urlbox to save it to your cloud bucket. -
To render asynchronously, switch to using the
/v1/render/asyncendpoint. More details can be found in the API documentation.
Whilst render links give you the convenience of rendering directly from an <img> tag, the JSON API gives more flexibility and is more suited for rendering from HTML. Read more about the differences here.
