
There are many reasons why developers might want to capture screenshots of web pages. You might want to capture an image generated from dynamic code that you've written, collect screenshots of web pages mentioned in a dataset that you're working with, or keep software documentation up to date by automating screenshots using a CI/CD tool.
It can be surprisingly tricky to take screenshots using Python, especially when JavaScript is involved. In this tutorial, you’ll learn to take screenshots of web pages using different approaches and packages in Python. You'll also see how a tailor-made solution like Urlbox can help you to easily capture screenshots of websites.
Taking Screenshots With Python
To follow along with this tutorial, you’ll need to have Python 3 installed. This tutorial uses Python v3.9.12.
All of the code used in this tutorial is available in this GitHub repository.
Setting Up the Project
Open up your terminal, navigate to a path of your choice, and run the following commands to create the project’s directory:
mkdir python-web-screenshots
cd python-web-screenshots
Create a virtual environment for the Python project by running the following command in your terminal:
python3 -m venv venvActivate the virtual environment by running the following command in your terminal:
source venv/bin/activateThat’s it—the project directory is set up and ready to go. Next, you’ll learn to take screenshots of web pages using different Python packages.
Using Selenium
Install Selenium and a web driver manager by running the following command in your terminal:
pip install selenium webdriver-managerCreate a main.py file and add the following code to it:
# 1
from selenium import webdriver
from webdriver_manager.chrome import ChromeDriverManager

# 2
driver = webdriver.Chrome(ChromeDriverManager().install())

# 3
driver.get('https://urlbox.com')

# 4
driver.save_screenshot('screenshot.png')

# 5
driver.quit()
The steps in the above code do the following:
- One: Imports the required packages. For this tutorial, you'll import the Chrome driver (
ChromeDriverManager), but you can use the driver of your choice. - Two: Creates a driver instance (
driver) for the Chrome web browser. - Three: Fetches (
driver.get) the page specified in the URL so you can take a screenshot of it. - Four: Saves the fetched response as the screenshot (
driver.save_screenshot). - Five: Closes (
driver.quit) the driver and exits the program.
You can execute the Python script above by running the following command in your terminal:
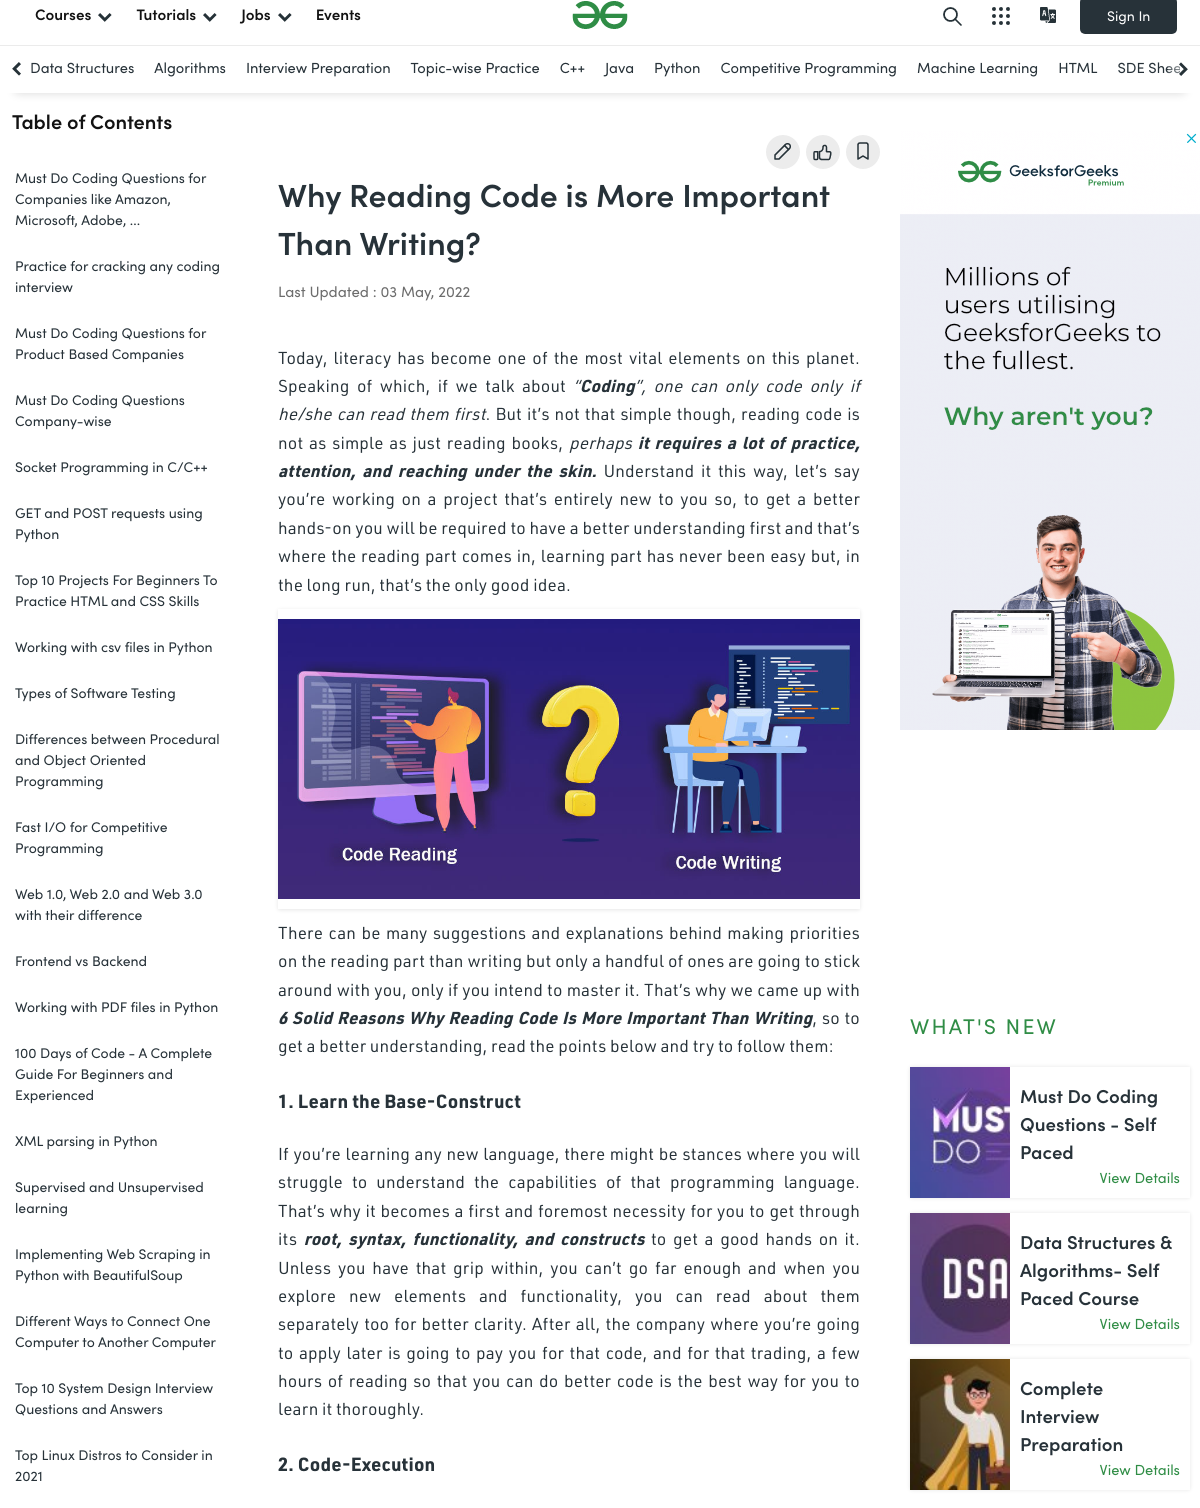
python main.pyHere’s what a screenshot of a blog looks like with this method:
You can see that the screenshot was taken while the page was still loading—the empty space on the right side is supposed to contain a block of content. You can go to the original page to see for yourself what it should have looked like.
In addition to the possibility that the screenshot will be captured before the website is ready, you need to manually configure the width and height of the screenshot window to capture the full window. In most cases, this will result in odd scroll bars in screenshots taken with this method. Also, the cookies banner at the bottom of the page is blocking some content.
Using Selenium Headlessly
The approach above is only possible when you have access to a GUI. In some cases, like when you're using CI/CD tools, that approach won't work. To get around this limitation, you can use the headless approach to take screenshots of websites.
To do so, update the main.py file by adding the following code to it:
# 1
from selenium import webdriver
from selenium.webdriver.chrome.options import Options
from webdriver_manager.chrome import ChromeDriverManager

# 2
options = Options()
options.headless = True

# 3
driver = webdriver.Chrome(ChromeDriverManager().install(), options=options)

# 4
driver.get('https://urlbox.com')
driver.save_screenshot('screenshot.png')

# 5
driver.quit()
Again, looking at the code step by step, it does the following:
- One: Imports the required packages.
- Two: Creates an
Optionsinstance and set theheadlessparameter toTrue. - Three: Creates a driver instance (
driver) for the Chrome Web browser. - *Four:** Fetches (
driver.get) the webpage you want to take the screenshot off of by providing its URL and save the fetched response as the screenshot (driver.save_screenshot). - Five: Closes (
driver.quit) the driver and exits the program.
Execute the above Python script by running the following command in your terminal:
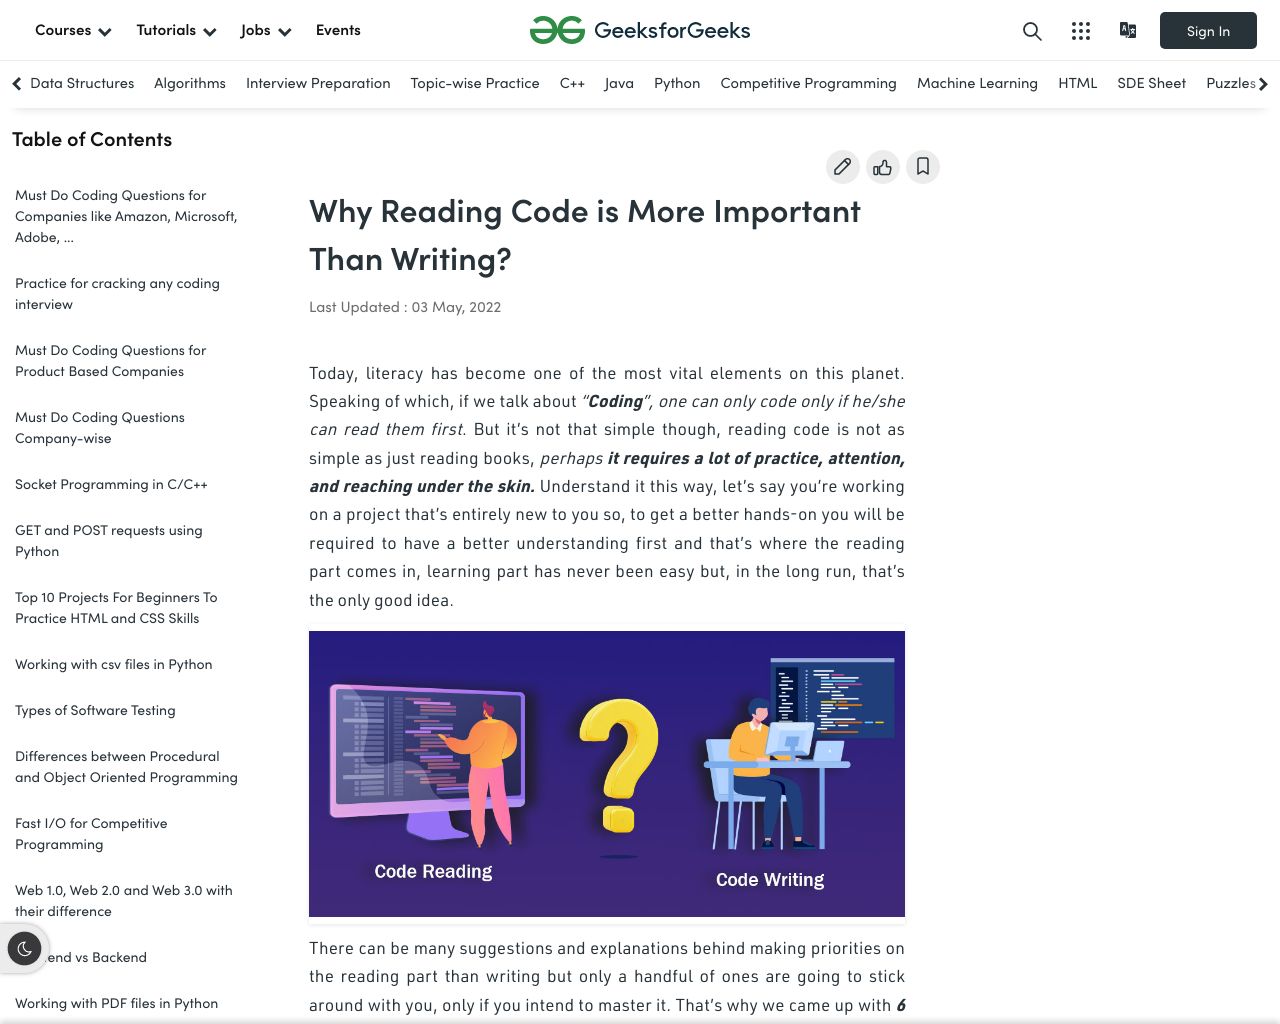
python main.pyHere’s how a screenshot of the same page from earlier looks:
This method automatically captured the webpage in mobile view, and doesn't do anything about the cookies banner at the bottom. However, it doesn't require spinning up a Chromium instance just for taking screenshots, and the result is better than the previous method.
Using IMGKit
IMGKit is a Python wrapper for the wkhtmltoimage utility, which is used to convert HTML to IMG using Webkit.
Install IMGKit and wkhtmltoimage by running the following commands in your terminal:
pip install imgkit
brew install wkhtmltoimage
Update the main.py file by adding the following code to it:
# 1
import imgkit

# 2
imgkit.from_url('https://youtube.com', 'youtube.png')
In the above code:
- One: Imports the
imgkitpackage. - Two: Downloads the specified URL, and saves the images using the
from_urlmethod fromimgkit.
Execute the above Python script by running the following command in your terminal:
python main.pyHere’s what a screenshot taken using this method looks like:
This method takes a full-page screenshot of the blog by default, though for simplicity, only the top part of it is shown here. This method was clearly unable to render the header and other elements at the top of the page nicely. There's also no official support for installing the wkhtmltoimage package on Apple Silicon Macs, which means you need to resort to workarounds such as using Rosetta or installing wkhtmltopdf, which installs wkhtmltoimage internally.
Using Shot-Scraper
Shot-scraper is a Python-based CLI tool built by Simon Willison. It allows you to take screenshots of the viewable portion of a page, full-page screenshots, and screenshots of specific sections.
To work with it, begin by installing shot-scraper by running the following command in your terminal:
pip install shot-scraperShot-scraper is built on Playwright, you'll also need to install Playwright by running the following command in your terminal:
shot-scraper installTo take a screenshot of a website, run the following command in your terminal:
shot-scraper <URL>You can also take advantage of CSS selectors to take screenshots of particular sections of a website by running the following command in your terminal:
shot-scraper https://simonwillison.net/ -s '#<SELECTOR-NAME>'This will take a screenshot of the designated element. Here’s what the screenshot looks like:

So far, this has been the best screenshot we’ve seen out of the box. It defaults to a full-page layout, but still fails to account for the cookies banner, and the content block on the top right is still empty. Let’s see how Urlbox fixes this.
Using Urlbox
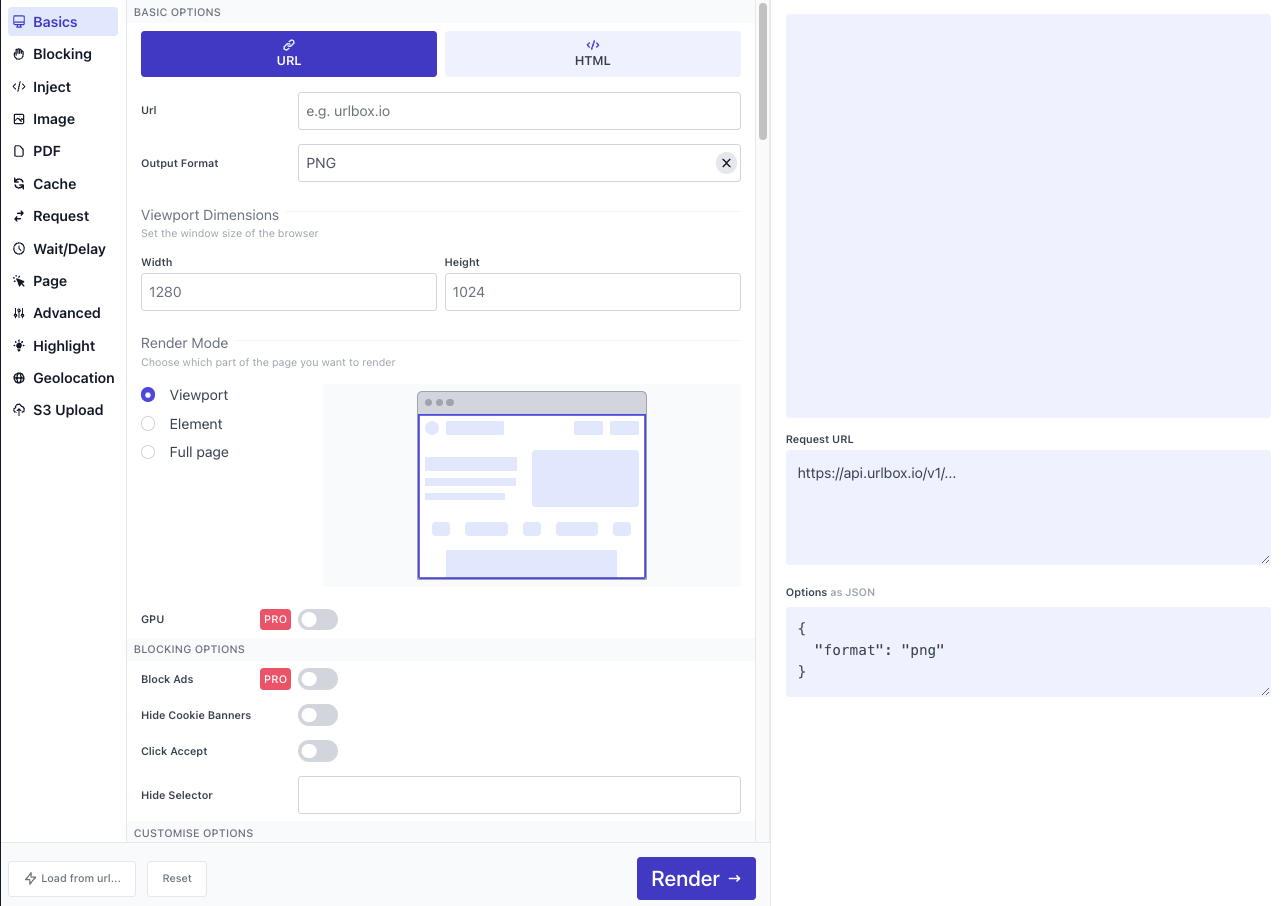
Urlbox is a screenshot API that allows you to take screenshots of webpages without having to write a single line of JavaScript. It allows you to block pop-ups, ads, and other interstitial elements that would detract from your screenshots. You're able to select specific elements to capture, block elements, take high-definition screenshots, emulate a dark mode, specify a user agent, and many other options with ease. It also offers a user-friendly GUI where you can preview all of the API options.
To get started with Urlbox, visit Urlbox and create a free new account.
When sign-up is complete, you’ll be given your API key and API secret, which will allow you to access Urlbox’s service:

Create a .env file at the root of your project, next to the main.py file, and add the API_KEY and API_SECRET as environment variables to it:
API_KEY=<your-api-key>
API_SECRET=<your-api-secret>
Install the Urlbox and python-dotenv packages by running the following command in your terminal:
pip install urlbox python-dotenvUpdate the main.py file by adding the following code to it:
# 1
from urlbox import UrlboxClient
from dotenv import load_dotenv
import os

# 2
load_dotenv()
API_KEY = os.getenv('API_KEY')
API_SECRET = os.getenv('API_SECRET')

# 3
urlbox_client = UrlboxClient(api_key=API_KEY, api_secret=API_SECRET)

# 4
response = urlbox_client.get({ "url": "<URL>" })

# 5
with open("screenshot.png", "wb") as f:
    f.write(response.content)
In the above code:
- One: Imports the required packages:
urlbox,dotenv, andos. - Two: Reads the
API_KEYandAPI_SECRETenvironment variables. - Three: Creates an Urlbox client instance (
urlbox_client) and provides it with theAPI_KEYandAPI_SECRET. - Four: Fetches the webpage (
urlbox_client.get) you want to take the screenshot of from the provided URL (url). - Five: Saves the fetched response as a screenshot.
Execute the above Python script by running the following command in your terminal:
python main.pyHere’s what the screenshot looks like:
Without tweaking any options, you can see that all of the content visible at the top of the page is visible, including the content block on the right. Now let’s take it up a notch by going for a full page screenshot with a set width:
response = urlbox_client.get({
  "url": "https://urlbox.com/",
  "full_page": True,
  "width": 1200
})
Here’s how it looks now:
The image above is a cropped version of the full-length screenshot of the page. You can see that since this is a full-page screenshot, the cookies banner and other elements that are supposed to be anchored at the bottom of the view frame aren't dangling in the middle of the screenshot. Also, the page has been loaded completely and all sections are clearly visible.
There are a multitude of other options available to help you maintain full control over the final appearance of your screenshots. For instance, you can block advertisements with block_ads, or hide cookie banners with hide_cookie_banners. You can also specify the image formats in which to save screenshots with the format option. You can implement all of those as follows:
response = urlbox_client.get({
  "url": "https://urlbox.com/",
  "format": "jpg",
    "full_page": False,
    "hide_cookie_banners": True,
    "block_ads": True
})
Here’s how the screenshot looks now:
This is not a full-page screenshot, but with the use of hide_cookie_banners and block_ads options, the cookie ribbon from the bottom and the ad block on the right of the page have been automatically removed! These are just a handful of the features that Urlbox offers.
You can read more about the available options. Urlbox also allows you to take screenshots and preview the effect of all options through the Urlbox dashboard.
Conclusion
In this tutorial, you learned to take screenshots of web pages using several different approaches and packages in Python. You also saw how Urlbox can give you more control over the final appearance of your image, while also providing you with an easier, more robust way to capture screenshots of your web applications.
